When we first bought our home in 2009, I thought that our raised, no railing concrete slab entry porch was pretty safe and user friendly. That thought was proven incorrect by my mother. During the first month of our ownership, she came to visit and check out David and I’s new home. On her way out late in the evening, she thought she would walk off the porch, avoiding the steps, because it was a more direct route to her vehicle, saving her about three extra steps. My mom didn’t realize that the “step off” was more like a 24 inch drop. I would say her step shock is similar to the shock you have when you drink coke when and are expecting water.
Fortunately, my mom was not hurt – her car caught her upper body. Once she had regained her breath and composure, she came back to the door (I presume up the steps) to let us know what had happened. I don’t remember my exact response, but most likely I teased her about having to send her to “the home” (nursing home). After I quit laughing, I let my mom know that I would do something about it.

Three years later, we fixed the problem. It most likely would have been another five years, but I decided to make David a swing for Father’s Day and I needed a place to put it. Below, I show our steps to completing our project. This project is quite different than most I have done in regards to David and I purchasing all brand new components to complete the project.
Preparation: I think one of the best ways to start a project is to Google what you are doing and look at images of other people’s projects. David and I knew that we wanted a pergola because it has sentimental value (we used one in our wedding) and we like the look of modern Arts & Crafts styling. We panned through 100s of photos on Google images and Pinterest and was able to get a pretty good idea of what we wanted.
At the start of every project, I make a quick sketch of what I want. If you are an iPad user, I recommend the free app, Penultimate by Evernote, to sketch out ideas. This is where I figure out the connection points and write down measurements. David and I’s porch is about 7 feet deep by 13 feet long, nothing grandeur, but is decent for an entrance and has room for a swing. Pergola’s are typically either a square or rectangle box ontop of posts with a slat roof. I find that if you break a project down into simple shapes, it makes it more manageable. After you figure our the shapes, you just have to figure out how they all connect together.
What to buy (about $280-350 Can’t remember the exact amount)
- 6 – 4x4x8 treated posts
- 4- 2x6x14 treated
- 14 – 2x6x8 treated
- Lattice – At first we purchased lattice for the top, but when we put it up we did not like it and ended up returning it. Instead we purchased 1x2x8 treated lumber so that it kept true to traditional pergola styling.
- 20 unique twisted joist hangers (shown below) to attach the top pieces
- 4 standard joist hangers
- 10 bags of 3/8’x3″ (quantity 4) lag bolts to attach 14 footers to posts
- 1 bag of 20+ 3/8 washers to go with lag bolts
- 1lb box 3″ outdoor multipurpose screws (attach railing later)
- 1lb box of 1 1/4″ deck screws
- 6 post holder feet things (my name for them) they are green and we don’t have a picture, however you can see them towards the end of the post in the pictures). You drill and attach these to the concrete and then place the posts down into them for additional support.
- 4 sleeve anchor bolts to secure pergola to the house
- Silicon or other type of sealer to insulate around sleeve anchor
Tools needed:
- Saw (chop saw is easiest)
- Tape measure
- Drill
- 3/8″ drill bit
- 1″ Spade drill bit
- Mason bit for sleeve anchor (if going into stone)
- Socket wrench
- speed square


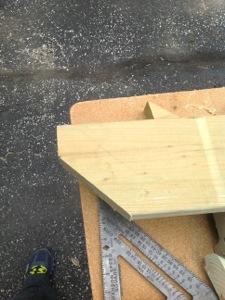
Step One: Cut decorative shape to one side of top pergola pieces.
(NOTE: we only cut one side because the other end is going directly into our house – no need for a decorative cut.)
We went with a simple 45 degree angle that started two inches down one edge – see below. You can Google pergola end design and find 100s of different types of cuts you can make. I wanted simple and attractive. The 45 degree cut is more masculine in appearance than one with more curves and cuts. I made this cut on one end of 10 – 2x6x8s and 4 – 2x6x14s.
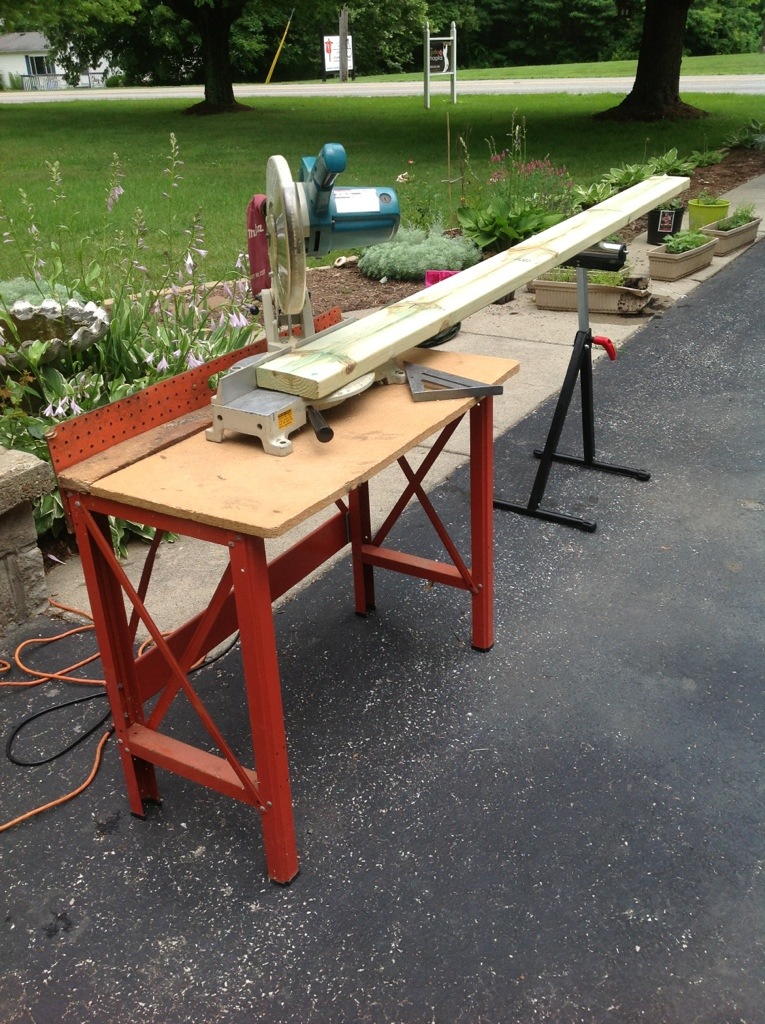
If you make the cuts all at the same time – it will go really fast and will ensure consistency in cuts.
The picture below shows our setup – a chop saw on a cheap/mobile workbench with a roller stand (to the right of the red table). I love my roller stand because it is like an extra person helping me hold up the wood.


Step Two: Attach post 1 to 14 footer.
Connect uncut end of the 2x6x14 to 4×4 post (we constructed this on the ground – later David and I lift it to the porch). To do this, pre-drill into the 14 footer and 4×4. You will most likely want to countersink the lag bolts so that it is less noticeable. You do this by drilling about 1/4″ to 3/8″ with the spade 1″ drill bit. Then place the washer and screw the 3″ lag bolt into through the board and into the 4×4 post. See below.
You will see that my husband used three per board on each post – maybe a bit overkill for the small size, however better safe than sorry. He marked where he was going to drill first so that lag bolts were distributed evenly and would look nice if ever noticed.

My little helper: 
Step Three: Connect post 1 to post 2.
Measure the length of the porch and subtract three inches (you will have a board on both ends totaling three inches – make sure to leave extra space for these boards) and use this number as a way to place the 4×4 at other end of the 14 footer. The 14 footer should extend roughly 12″ (or your desired overhang) past the 4×4. Remember to make sure that the length is from the far edge of the 4×4 to the far edge of the other 4×4. Attach the 14 footer by following step two directions.
At this point it should look something like the picture below – the cut end didn’t make it into the picture, sorry. These two posts and 14 footer will be above the window on the porch (see porch picture above).

Step Four: Connect post 3 to post 2 .
To do this, we measure the depth of our porch, roughly seven feet. We took an unused board (2x6x8 treated) and cut it down to our measurement. This “connector piece” does not have decorative cuts on either end. We attached this board to be flush with the 14 footer (you can sort of see it in the picture below). Below in the picture, you will see that we moved the three connected posts onto the porch. We had to cut off the 14 footer decorative end because it ran into the guttering. We fixed the issue and I will show you later in this post.
When working on bigger projects, it is always nice to have extra hands available to move/lift stuff. For this project, I was just David and I. The neighbor who usually helps us out was not home. If you do the math, you will see that it is three posts and two people. To get it onto the porch. David lifted between the posts going over the door and I lifted the third post onto a bucket. The bucket helped relieve me of a lot of weight and allowed me to help David out.

***Step five through seven are really confusing when you write it out- in all you are creating a 1’x7′ box with 1′ overhang around four posts. The picture after step seven should sum it up – I should have made a video to explain.
Step Five: Attach post 4 to a 14 footer on the driveway.
David attached the decorative cut end of the 14 footer to the 4×4. To do this, we first measured the distance from the far edge of post 2 (including the connector piece width) to the exterior edge of post 1. Triple check this number because this is what will make your pergola square and not lopsided.
Step Six: Attach post 4 to post 3.
David and I lifted the post and 14 footer up onto the porch. While I held the 4×4 in place, David climbed up the ladder with the 14 footer to connect it to post 3. David temporarily nailed the 2x6x14 to the post so that he easily pre-drill the anchors without fear of the board moving.
Step Seven: Connect post 4 to post 1.
Measure the 2×6 connecting post 2 to post 3. Replicate this board to connect post four to post 1. (In the picture below, we set one of the top boards on to see what it might look like – we got excited).

Step Eight: Back track a little.
When we started I forgot the two of the 14 footers would be on the interior, meaning that the decorative ends have to be cut off (12″) and attached on to the frame to “fake” that the 14 footer is going the entire length of the pergola. See picture below – sort of confusing to explain. If you look at the decorative cut end by David, you will that it is actually attached to the board connecting post 1 to post 4. Basically floating there.

Step Nine: Anchor pergola to the house.
To do this we used sleeve anchors as they work nicely with stone. We didn’t think to seal around the bolts – later we got some water in the house. David drilled the holes and then inserted the sleeve anchor into the board and stone. He followed the directions on the package by tightening the bolt as much as he could.
We put two bolts above the window and two above the door. We put a lot in because we are going to be hanging a swing from the pergola and would prefer for the pergola not to move with the swing.

Step Ten: Connecting the remainder of the 14 footer to the interior side between post 3 and post 4.
Measure the distance from the outer most edges of post 3 to the outer most edge of post 4. Cut your 2x6x14 (should be roughly 12″ shorter than this due to cutting off the decorative end used in step 9). David used the three inch exterior grade screws instead of the anchors here – he felt that they were not holding up the same weight as the other boards in the project.
Step Eleven: Repeat step ten for other interior piece. See picture below – David has serious work face. ***You have to anchor to the house before this step, otherwise, you will no longer be able to access the board touching the house.

Step Twelve: Board 2 between post 2 and post 3.
To be consistent with design, we added a second interior board between post 4 and post 1. Measure the distance and make your cut. We used a U shaped joist hanger on each end to attach it to the pergola frame.

Step Thirteen: Repeat Step Twelve on Other End.
Step Fourteen: Put up any additional posts.
We added two 4×4 posts by our steps because we are going to add railings to either side of the steps to up the safety standards (for you mom). Make sure to use a level on two sides to ensure that your post is perpendicular to your pergola frame.
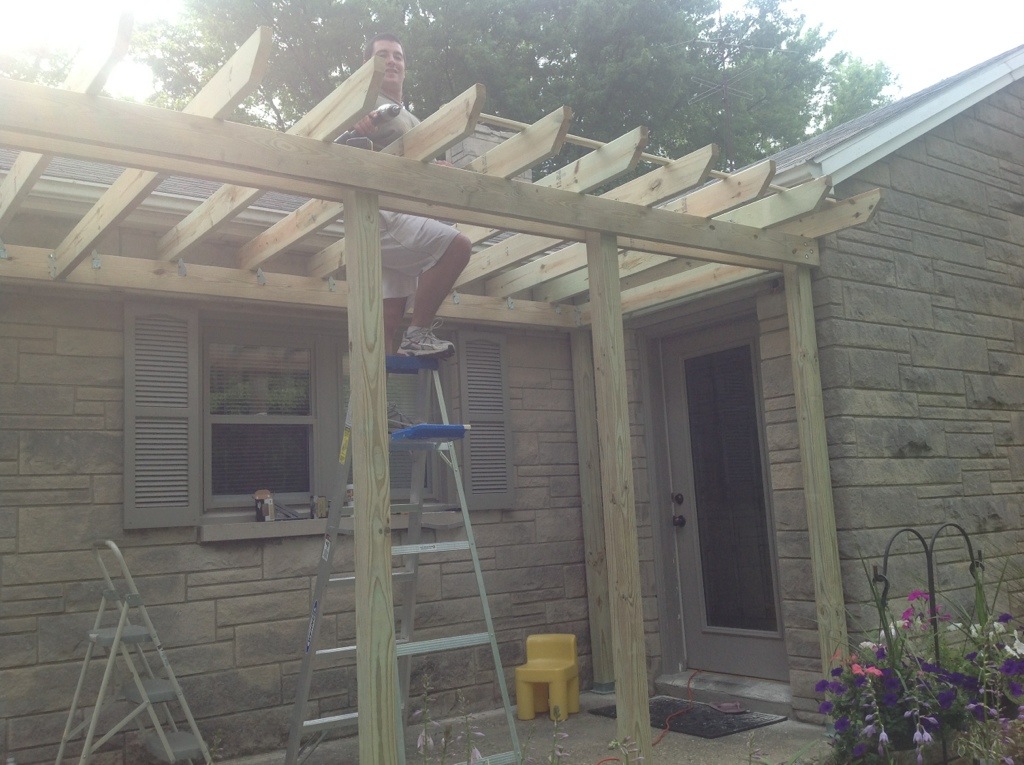
Step Fifteen: Place all 2x6x8 treated, decorative cut end boards on top of your frame.
We spaced ours roughly 16″ and adjusted the measure to make it fit out area. We did this dry fitting first to ensure that our numbers were correct and that it looked okay before we attached it to the pergola frame.
Step Sixteen: Attached 8 foot boards with the twisted joist hangers pictured in the supplies areas on this post.
We used a total of two hangers per board because they aren’t holding any weight and are more for decor. See picture below – it is starting to come together!!

Step Seventeen: Adding the roof.
Originally, I thought that I would want lattice to cover the top, but I did not like it. If you want significant shade, I would recommend the lattice. I wanted it to be a bit more open and more true to traditional pergola styling. I will get more shade once some of my climbing roses and wisteria mature. For this roofing style, we used 1x2x8 treated lumber. That is the longest piece we could find at Menards for 1x2s. You will notice in the picture below that we did not start the 1×2 on the edge, but rather away from the edge – I thought it looked better this way. We measured about 12 inches from the edge and made a mark. Then, we aligned the 1×2 to the mark. We made 6″ spacers out of spare wood and used them to align all the remaining 1x2s.
After step seventeen:

My next post will be about making the porch railing. I will end this post with a cute picture of Reese being a helper.


Very nice. You ought to show your plans and the nearly finished project for our pool patio. Very nice too.